Showing posts with label create. Show all posts

Thursday, November 19, 2015

Kids Cooking Creative Veggies


Make Veggies Fun & Creative
Children love to cook when the food is made quickly and looks interesting. Potatoes are a good choice because they cook quickly and can be dressed up or dressed down for picky palettes. They fill kids up with a variety of vitamins and minerals.
  In 1995 potatoes became the first vegetable to be grown in space as an experiment for long voyages. The Incas in Peru started growing potatoes in 8,000 B.C., but the Spanish did not introduce them to Europe until 1536. Later the English brought them to Jamestown, Virginia.
  Thomas Jefferson introduced French fries in 1801. As we know, they taste good but are not healthy. Good alternatives to fries are roasted potatoes easily made with children’s help.

Roasted Potatoes
  Cut the potatoes to look like chunky fries. Adults can do the peeling and cutting into fourths the long way. Then children can use a table knife to

Even Shopping Is Learning
cut them into strips. If they need help, put your hand over theirs to apply a little more muscle.
  Place in a bowl and add a few tablespoons of olive oil, enough to coat the potatoes.  Sprinkle a little salt and pepper and toss until evenly coated. Children will enjoy carefully pushing them around. Then kids can organize them on a cookie sheet in rows one layer thick. Place in a 450-degree oven for 15-20 minutes.  Check and gently stir or turn occasionally. When slightly cooled, children may dip in ketchup.
  For variety try some of the 3,800 kinds of potatoes. In the U.S. potatoes are blue, purple, red along with yellow and white. Add sweet potatoes (not real potatoes) for the orange color. If children will eat them, leave the skins on for more nutritional value.
Dinosaur Spuds

 
Baked Potatoes + Veggies
Baked potatoes can be made into many animals and objects by decorating them with vegetables like raw carrots, cooked peas, beans, and peas. Speed up the cooking time by placing in a microwave.  First cover one thoroughly washed baking potato with olive oil and pierce the skin on each side with a fork. Cook on high in the microwave for about three–five minutes, turn over and cook for about three more.  Test for "doneness." It should be squishy. Check on it or you will have a rock.
  To make dinosaurs cut two wedges off the top of the potato to use them for a dinosaur neck, head, and tail and set aside. Mash up the inside and add butter to melt. Carefully arrange one wedge to like a neck and head sticking out of the potato and add the other for a tail. Children can add little pieces of tomatoes, beans, or sweet pepper for eyes and tail plates. 

Photos: Fran Darling: fdarling fotos 
More Ideas and Activities....See the authors’ book “Learning Through the Seasons” at area bookstores and grandparentsteachtoo.org. For more help to prepare young children for success in school see the authors’ web site: www.grandparentsteachtoo.org. Also check our audio Podcasts WNMU Radio, 90Youtube video activities; and join us on Pinterest

Tuesday, May 26, 2015

Kids Create Their Own Fun

Play Home-Made Hockey
Families can teach children to make their own games from material around the house. It’s an example of American ingenuity: making something from very little or changing the function to create a whole new product. This is a skill young children can be taught so they are never bored.
Teaching American Ingenuity
  Adam and Leah wanted to go fishing, but couldn’t do the real thing today. They started looking for poles, bait, line, and fish materials around the house.  They gathered yardsticks, yarn, refrigerator clip magnets, and paper clips. With help they attached the yarn, pole and magnets. They spread the paper clips around the floor in a small circle. The person who was “up” was given until the count of 5 to gather some clip fish during a turn. Then the next person took a turn.  When the magnets picked up all clips, they counted to find the winner of that round.

  The principle they used was, “ Think of a game or sport and simulate it with materials around the house.” Their game was easy, cheap, and entertaining with a little bit of learning mixed in.
  How many fishing games can your family create when the weather is foul or the real fish aren’t biting? Paper clips could be placed in a bucket of water.  A reluctant preschool child who needs to soak in the tub could have large colorful paper clips in a floating dish and use a ruler, string and magnet to fish.  The principle is still the same.
Team Creations


Make Hockey Sticks: Cardboard & Paint Stirs
  Another game that has many variations is bowling.  Grandma Dee was providing childcare for four little boys one rainy afternoon. She has been teaching the boys to make games plus little learning out of materials around the house. They decided to make a bowling game out of dominoes.
  Here are the rules they devised. Place dominoes face down on a table. The first player chooses ten dominoes and stands them up between the two players. The blank side faces the person who has the turn. This player lays a domino about one foot away from the standing dominoes and flicks it to knock down as many dominoes as possible. When all dominoes are knocked down, the dots are totaled and the next person chooses a different set of ten and takes a turn. The grand kids worked as a team to create a new game from materials around the house. A little bit of math was worked into the fun. Mission accomplished.

Hit the Tape Spool Puck
  Parents and grandparents often think back to their childhood when they created their own games and other entertainment. Today’s children can do the same. There is never boredom when children learn to create their own fun and learning.
 Photo: Fran Darling, fdarling fotos

More Ideas and Activities....See the authors’ book “Learning Through the Seasons” at area bookstores and grandparentsteachtoo.org. For more help to prepare young children for success in school see the authors’ web site: www.grandparentsteachtoo.org. Also check our audio Podcasts WNMU Radio 90Youtube video activities; and join us on Pinterest

Monday, May 18, 2015

Geography Fun Helps Preschool Kids


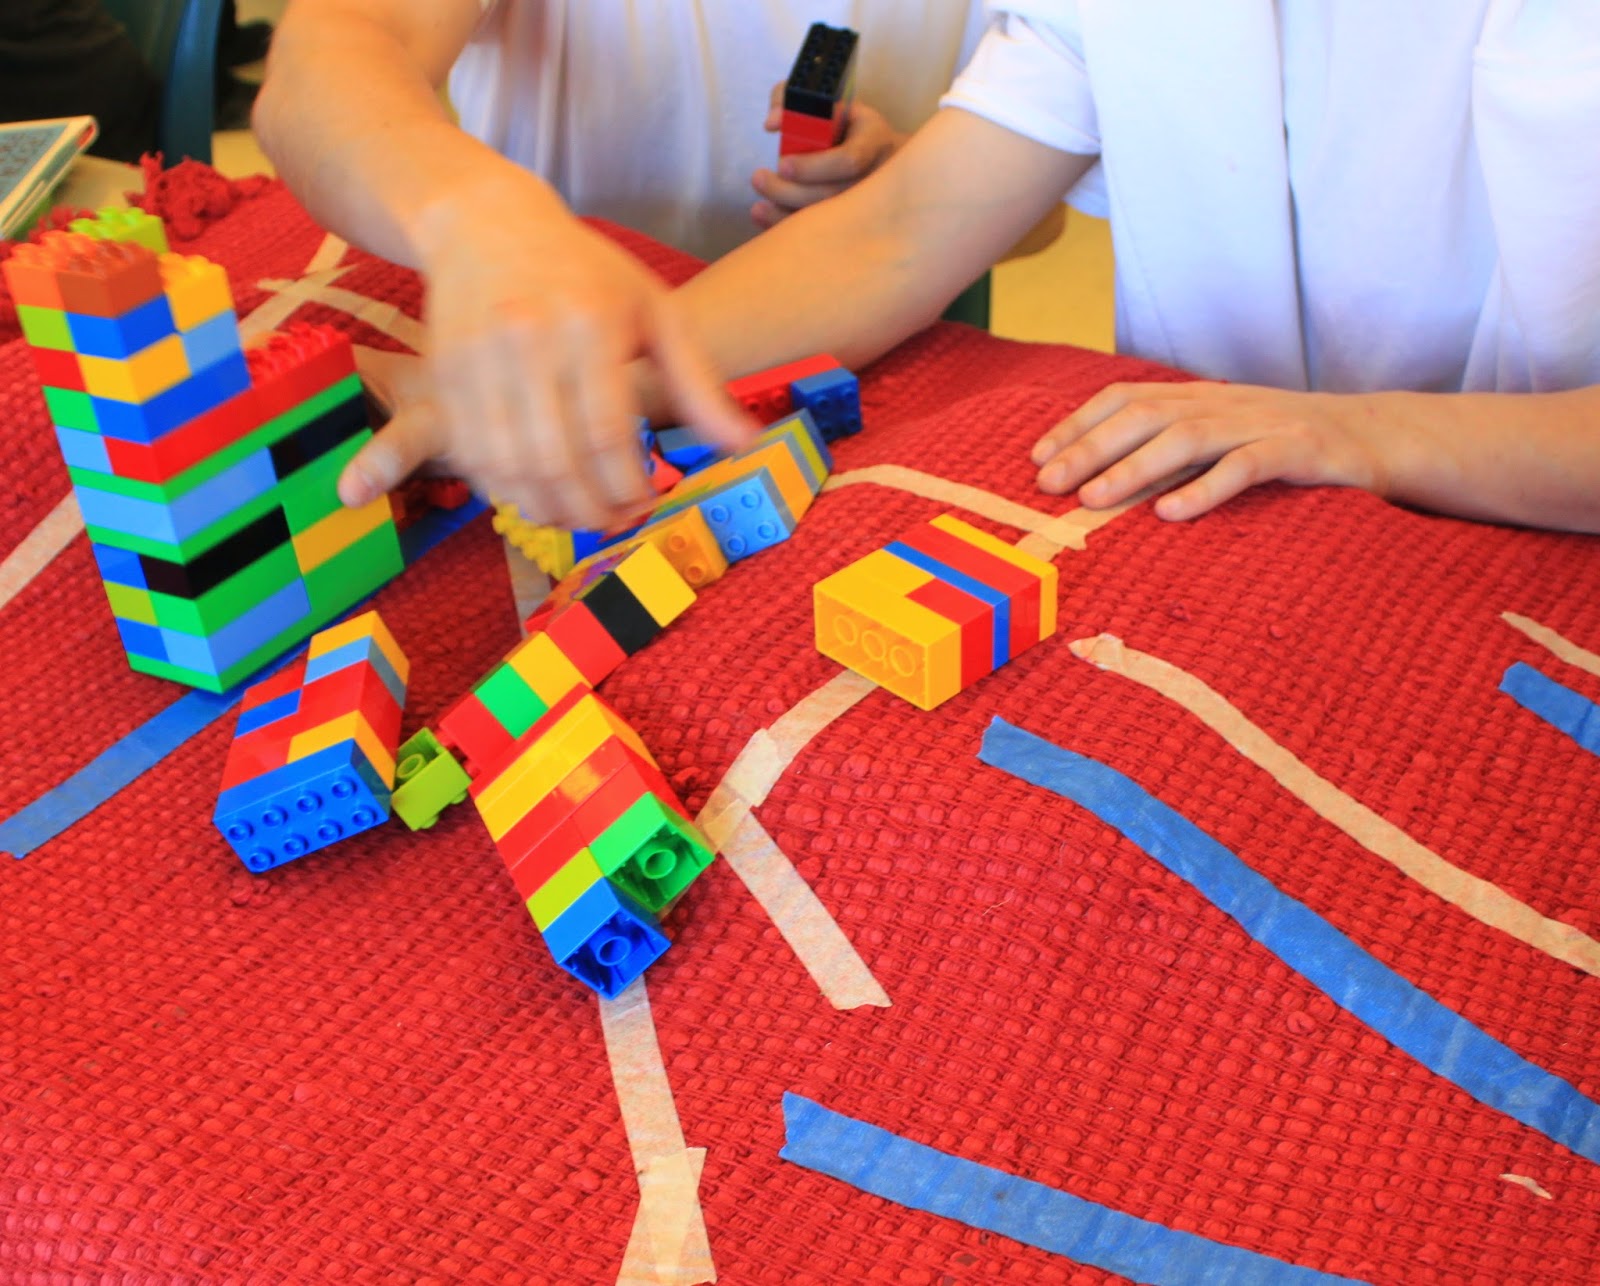
With a rug and a few
 Ready to Travel in Newly Built Cities
small cars and trucks, families can teach geography and economic concepts that will be used throughout their lives.
 To make the geography rug gather a relatively smooth large rug, small cars and trucks, plastic animals, Lego type blocks, blue and tan masking tape, towels and shoes. 

Build Hills & Valleys
Making the Scene
  Spread a rug on the floor or table. Explain to children that they will be making a town. The location may be real or imaginary. What will the place look like?  Are there hills and valleys? Are there rivers and lakes? Older children can make a topographic rug map of the United States with the mountain, Great Plains, rivers, and cities.

  Explain that land is not usually flat. There are geographic features on the place like hills, mountains, and rivers. Tuck towels and shoes underneath the rug to make these bumps with valleys between. Cake pans or plates underneath can make plains.
Add rivers with blue masking tape. Point out to
Build Lego Buildings
children that rivers flow down hill and end in the lowest point. Children can cut out lakes and ponds from blue paper.
 Add Human Features
   Create features humans have added to their environment. Tan masking tape can be paths, streets, and highways.
  Help children make a list of the buildings and other places they can make from Lego–type blocks and cardboard like stores, hospitals, schools, churches, parks, homes, and bridges. Add them and any small plastic animals you may have to the rug.
   How are people going to interact with each other and their environment in the city you have created? Is the grocer out of oranges and calling for a truck to bring them to the store? There are many stories to create adding action to play time.

Add Cars, Planes, Trucks
  There is constant movement. Trucks carry fruits, vegetables, milk, lumber and cars from one location to another.  Garbage trucks carry wastes to landfill. Fire trucks, ambulances, and police come to the rescue when there are accidents.  Sometimes police hand out speeding tickets.
  Where are people going? Do some need help? Are roads blocked and need repair or plowing? Use cotton balls for snow. Ask is this place like other regions?
  When children are finished, the geography/economic rug can be stored in a container for next time.
 Richard Scarry’s Busy Town books are excellent to introduce economics, and community helpers for this activity. Libraries have many books to help families teach more about the Five Themes of Geography: location, place, human relationships with the environment, movement, and regional similarities and differences that are also taught in schools. While on family trips use the Five Themes to teach all about the areas visited. This is a great way to organize pictures for a family vacation book.

photos: Fran Darling, fdarling fotos
More Ideas and Activities....See the authors’ book “Learning Through the Seasons” at area bookstores and grandparentsteachtoo.org. For more help to prepare young children for success in school see the authors’ web site: www.grandparentsteachtoo.org. Also check our audio Podcasts WNMU Radio 90Youtube video activities; and join us on Pinterest
Tuesday, March 31, 2015

Making a Kid’s Indoor Golf Course


Preschool teachers have many good suggestions for making child care easier for parents and grandparents. They recommend alternating short active and quiet activities between meals, nutritious snacks, naps, and reading. Quiet activities are easy indoors, but active ones can be easy, also, when weather is inclement.  Almost any sport can be adapted for indoor play with recycled materials.
Indoor Mini Golf
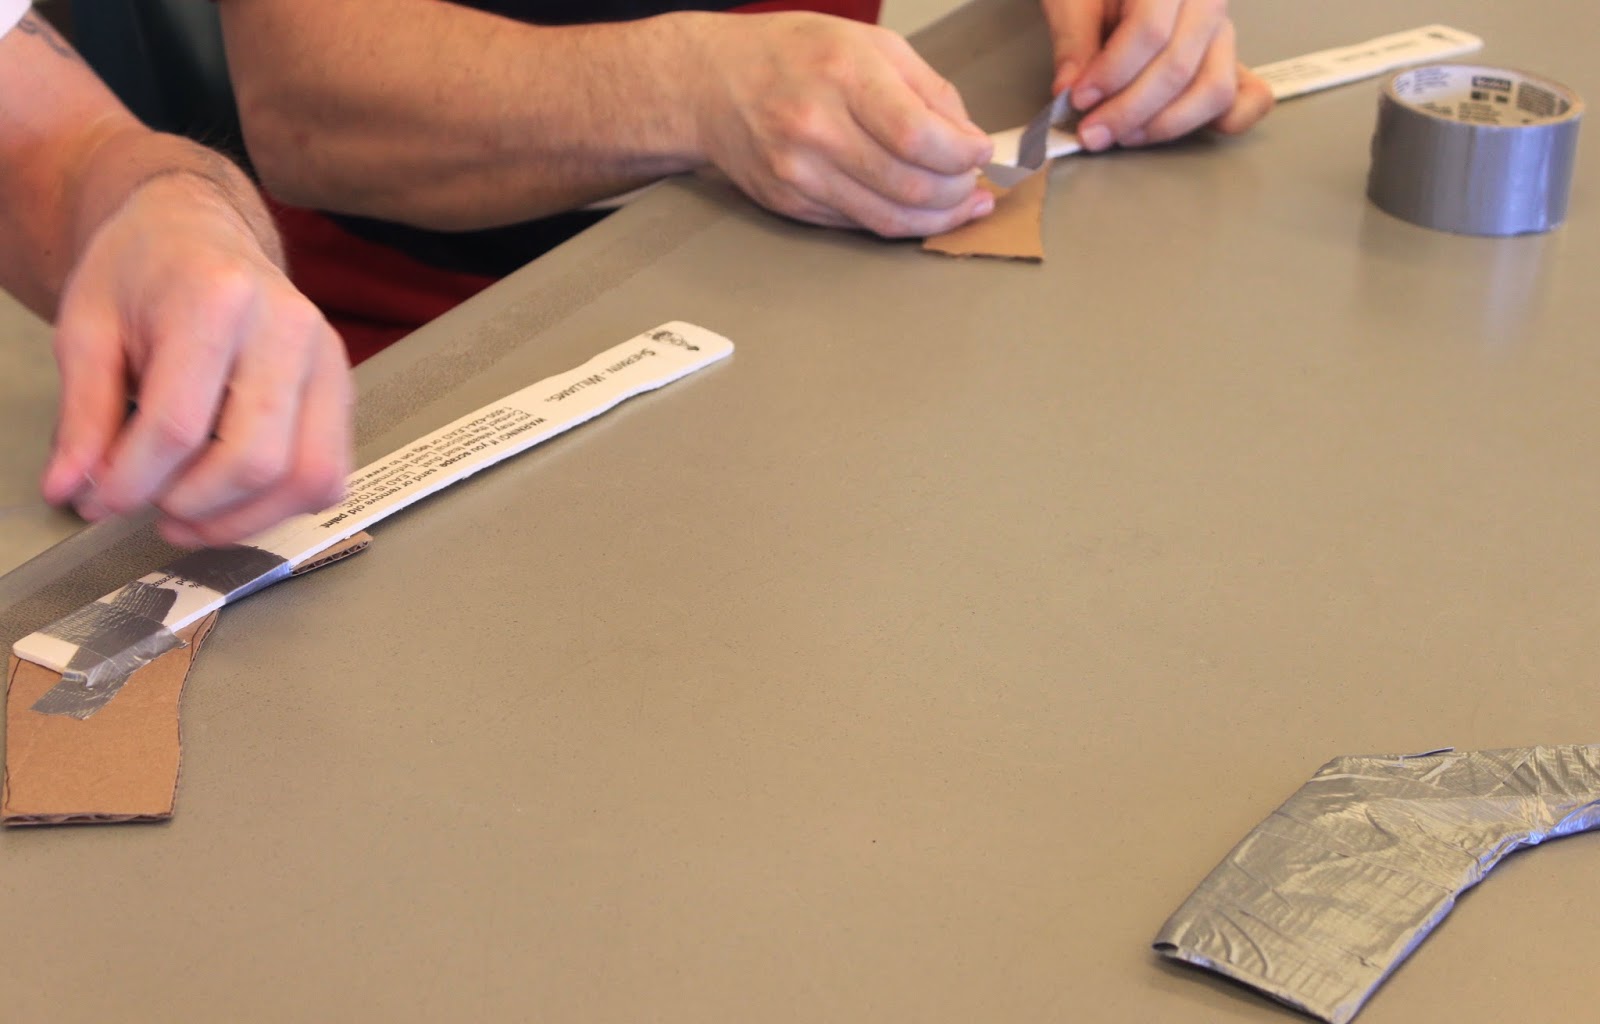
  To make an indoor miniature golf course collect small boxes, plastic containers, small rugs, cardboard tubes and pieces, duct tape, paint stir sticks, cups, stuffed animals, and small balls.
  Conversation and planning together are so important while creating the obstacles for a miniature golf course. If children have never been to one, search on You Tube or Google images for miniature golf courses. Make a list of obstacles. Then think of ones you can create with materials around the house. If you make the obstacles in small modules they can be stored in a few bins and taken out again later.
Construction Plan
  Design your course together and make a map of your plan. You’re teaching children that a plan is needed whenever they do a project. Do children want a theme of princesses, teddy bears, Star Wars, or cars? What is the course’s name?

  Real miniature golf courses often have obstacles with an entry and an exit.  Children can choose boxes, decorate, and plan placement while adults cut the openings. An empty oatmeal cylinder makes a good tunnel.
  Courses often have ramps. These can be made with blocks or small boxes and a wide strip of cardboard or wood.  Look among the toys.  Perhaps children can make Lego or large block bridges and ramps. The construction time is another means to create time for family discussion and vocabulary building.
   Talk about gravity and ramp height. While making
ramps, add cardboard and duct tape fences along the edges to keep the ball on the ramp. The toy box might also have plastic train parts that can be curved ramps for the ball.  Some ramps might lead to nowhere with a cup at the end.
  Stuffed animals, dolls, and action figures are excellent for guiding the ball’s path and decorating the course.  Each section can be named for a character.
  Courses also have rough areas. Use a rug and make small bumps. Stuff newspapers or small blankets under rugs or sheets to make the curves and hills. The difficulty can easily be adjusted.
  Golf clubs may be a small hockey stick or a paint stick with a rolled newspaper or cardboard attached with duct tape. Balls can be made from newspaper surrounded by tape.
The last step of playtime is cleaning up so toys can be found again.

Photo: Fran Darling; Sketch: Nowicki
More Ideas and Activities....See the authors’ book “Learning Through the Seasons” at area bookstores and grandparentsteachtoo.org. For more help to prepare young children for success in school see the authors’ web site: www.grandparentsteachtoo.org. Also check our audio Podcasts WNMU Radio 90Youtube video activities; and join us on Pinterest

Tuesday, September 2, 2014

Pressed Flower II -- Fun with Kids


Photo: fdarling fotos, Fran Darling
It doesn’t matter what activities adults choose to do with young children. It only matters that adults do them often and have fun and talk together.  Pressed (dried) flower projects are good choices in late summer.
  These glass luminary candles with pressed flowers are beautiful gifts.
Materials Needed:
  You’ll need glass votive candle holders, thin clear tissue or facial tissue, white glue thinned with a little water, small pressed flowers or leaves.
  Coat the outside of the glass with the glue and water mixture and cover with tissue.
Arrange pressed materials on the tissue covered votive and brush on another coat of glue. Cover the entire outside with another tissue and glue to hold the flower or leaf in place.
  Coat with 3 or 4 more layers of glue to seal it making sure you let it dry between coats. You can use a few coats of spray on acrylic sealer or other sealer that dries clear. The glass will have a frosted look. Dry thoroughly. When the candle is lit, the light shines through the pressed materials for a beautiful effect.  Young children can substitute tea lights lit by a battery for safety.
Frames, notes, and Bookmarks
 Framed pressed flowers make very delicate pictures that do not fade. Children can use watercolors to paint wavy lines and swirls on paper. Spatter some water on the paper or run through a dripping water faucet to blend the paint.  They can be used for thank you notes when dried and ironed on low.
Photo: fdarling fotos, Fran Darling
  While the paper is drying, children can choose some small dried flowers, dried ferns and burning bush leaves. Apply a few dots of white glue on the back of the foliage.  Wipe off any excess glue that may seep around it. Then place a heavy book on top and let dry overnight. Insert the picture in a small frame when dry.
  Pressed flower cards and bookmarks are made the same way. Use card stock paper so the paper will not flop around from the weight of the dried material. Place a heavy book on top and dry overnight.
  Search children’s poetry books for a few poetic lines or make up your own.
Use colored markers to make designs around the flowers or add a short quote or note. You can then write your message on the card and send it to someone special, or you keep it for future use to be given for occasion. Pressed flowers can also be used to decorate gift packages, rock paperweights, and magnets. Notes will not go through the mail because they are lumpy. Place inside a gift box.
More Ideas and Activities...
See the authors’ book “Learning Through the Seasons” at area bookstores and grandparentsteachtoo.org. For more help to prepare young children for success in school see the authors’ web site: www.grandparentsteachtoo.org.
Also check our audio Podcasts WNMU Radio 90Youtube video activities; and join us on Pinterest.
 

Tuesday, August 12, 2014

Creating A Home Art Corner


fdarling fotos
 What would happen if you provided an art corner for your children and supplied them with objects found around your home and in the great outdoors?  What if you read to them every day and took them to the library and provided a literacy-rich environment?  Listen to the words of Caldecott Award winning children’s illustrator, Lois Ehlert, tell us about her childhood experience as described in “The Scraps Book: Notes From a Colorful Life.”
  “When I was little, I read all the books on the library shelf, and I thought maybe someday I could make a book. I was lucky. I grew up with parents who made things with their hands.  Mom loved to sew.  She had colorful fabric scraps, buttons, lace, ribbons and many scissors that she shared with me.  Dad had a basement workshop.  He gave me wood scraps and taught me how to paint, saw and pound nails.  So I had wonderful art supplies and tools close at hand.  In a small corner of my house, Dad set up a folding table for me.  It was my spot to work and dream.
 Ehlert goes on to tell how she created a love of art but not for books right away.  She knew that it takes time to develop dreams. 
Easy Ideas
fdarling fotos
She finds her book ideas and inspiration from the world around her.  For example, shopping for fruits and vegetables gave her the idea for her book, “Eat  She planted a spring garden for her mother using red, orange, yellow, blue and purple flowers. The result was the book “Planting a Rainbow.”  Children could pick and dry flowers to make a rainbow garden picture for you.
ing the Alphabet.” Your children could eat their way through the alphabet for fun.
  “The Scraps Book.” provides several other sources of inspiration including her ice fishing decoy. Your children could make little bird, or other animal decoys with nature scraps or wood glued together and painted.
  Ehlert tells about her art technique called collage.    She describes it as very messy but “when ideas are flowing, I keep working.”  She uses a variety of tools to create texture, including spatter painting with a toothbrush and rubbing a crayon over a grater.  She adds objects close at hand such as toys, food, pinecones, seashells or bottle caps.  The many colorful photographs in the book show the results and give children ideas for their own projects.
Creative Focus
  Why is this important to children?  Creativity focuses on process of forming original ideas through exploration and discovery.  Creative children learn to think and solve problems for themselves.  They learn not to fear mistakes and feel free to invent, create and find new ways to do things – all valuable and much-needed skills in today’s world. 
Photos: Fran Darling fdarling fotos
More Ideas and Activities...
See the authors’ book “Learning Through the Seasons” at area bookstores and grandparentsteachtoo.org. For more help to prepare young children for success in school see the authors’ web site: www.grandparentsteachtoo.org.
Also check our audio Podcasts WNMU Radio 90Youtube video activities; and join us on Pinterest.

Monday, August 4, 2014

Making Wind Chimes With Kids


Are you looking for a windy day project for your young children?  Create your own beaded wind chimes to teach patterns, design, and color. Provide fine motor skill practice and another opportunity for conversation.
   To design wind chimes help children create a hole in the center of a cottage cheese or margarine plastic lid with a paper punch. Make eight to ten more holes evenly spaced around the outer edge. Help children cut a 12 inch piece of string for each outer hole and a 14 inch piece of string for the center hole. Wrap a piece of tape around one end of each string to make it easier to thread the beads and tie a large bead onto the end of the other string pieces.
Art and Talking
  Have an assortment of multi-colored beads and small brass bells available. Your children can experiment with color, size, texture and design as they arrange beads and bells on the strings. Carry on a conversation about the choices they make. You may cut several colorful plastic straws into ½ -1 inch pieces to use as spacers between the bells and beads.  Leave at least 2 inches on the top of each piece of string.  Pull the taped end of each beaded string through a hole in the lid. Tie a big knot on the top to keep the string from sliding through. 
  Place one large bead on the 14- inch string and thread it through the center hole in the lid.  The bead will be on the underside of the lid to keep the string in place.  This is the string you will use to hang the chimes.  Find a sheltered spot outside or inside near a window.  Enjoy the melody!   Extend the activity by making additional wind chimes out of driftwood, seashells, spoons, or recycled items.
Wind Science
  As you are working, talk with your children about the wind. What is it?  What makes it blow? Has there been strong wind lately? Wind is moving air.  When warm air rises, cool air moves in and takes it place.  This moving air makes the wind blow.
fdarling fotos
  Before dressing in the morning check trees and flags for signs of wind. Go outside and feel the wind, dance with the wind and see what moves with the wind.  Paint a picture or write a poem to describe your experience.  Then go to the library and look for books about wind.  In his book, “Like a Windy Day,” beloved children’s author, Frank Asch, sends a young girl soaring, tumbling and twirling on her own exciting windy day adventure.   Renee Schwarz offers other wind-powered crafts in her book, “Wind Chimes and Whirligigs.”

Photos: Fran Darling,  fdarling fotos
More Ideas and Activities...
See the authors’ book “Learning Through the Seasons” at area bookstores and grandparentsteachtoo.org. For more help to prepare young children for success in school see the authors’ web site: www.grandparentsteachtoo.org.
Also check our audio Podcasts WNMU Radio 90Youtube video activities; and join us on Pinterest.